 Daily Race C
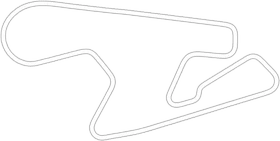

Kiwi Antonelli asked for this analysis in the Lap Analysis thread and shared the link to the session. Digit took the best lap of the three, the 1:18.683 on lap 2, put it against Digit's own best lap from the same Daily Race, a 1:16.321 on the same tyres, and went through it corner by corner in Traces.
One thing to know first: the reference lap is in a different car. Kiwi Antonelli drives the Volkswagen Beetle Gr.3, Digit's lap is in the Subaru BRZ GT300 '21. Both are Gr.3 cars under the same Balance of Performance, so the lap times can be compared, but they are not the same car. On the two long straights they reach the same top speed, 239.1 against 239.6 km/h on the main straight and 235.1 against 235.1 km/h before the big stop, so the time is in the corners. Gears, revs and steering lock are not comparable between two different cars, so this analysis doesn't read anything into them, and where a difference is only the car, it says so.
Both laps were recorded live, not from a replay, so the brake points in both are where the pedal really went down and need no correction. Every number below comes from Traces: the Coach, or the telemetry of the two laps measured at the same point on the track. Distances are metres from the start line, measured along the reference lap.
The summary
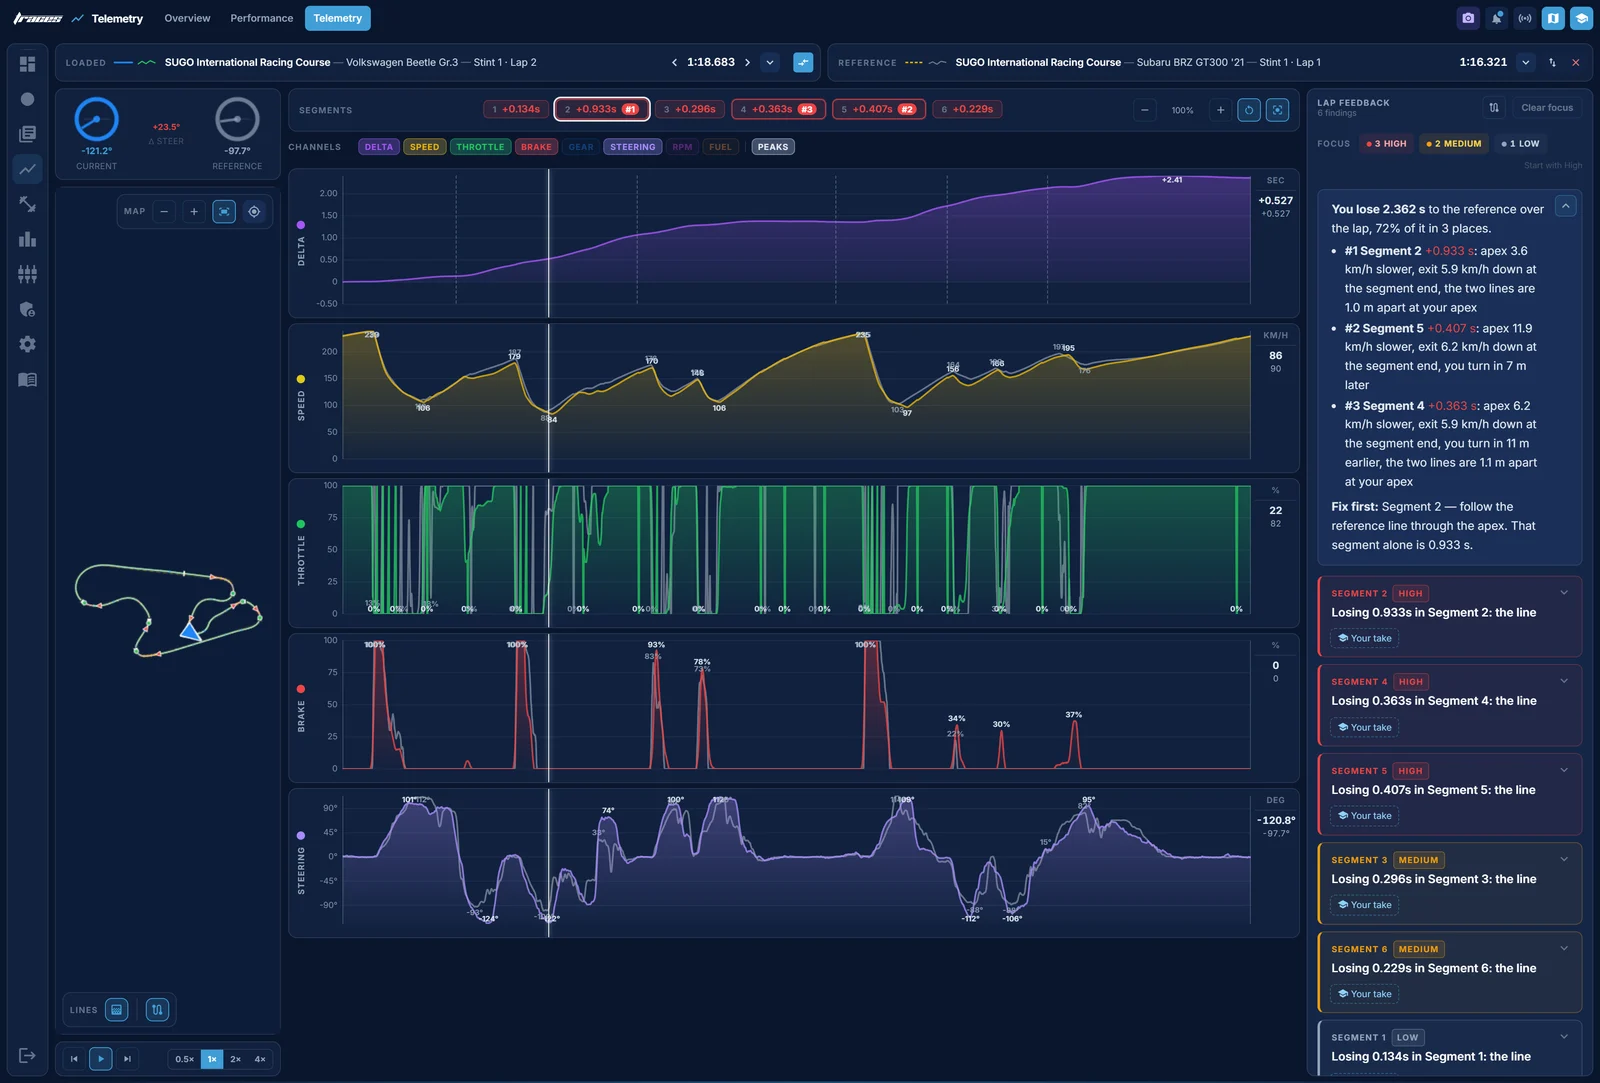
Kiwi Antonelli loses 2.362 s over the lap. The Coach puts 72% of it in three places:
- Segment 2, +0.933 s: apex 3.6 km/h slower, exit 5.9 km/h down at the segment end, the two lines are 1.0 m apart at Kiwi Antonelli's apex.
- Segment 5, +0.407 s: apex 11.9 km/h slower, exit 6.2 km/h down at the segment end, Kiwi Antonelli turns in 7 m later.
- Segment 4, +0.363 s: apex 6.2 km/h slower, exit 5.9 km/h down at the segment end, Kiwi Antonelli turns in 11 m earlier, the two lines are 1.1 m apart at Kiwi Antonelli's apex.
Fix first: Segment 2, follow the reference line through the apex. That segment alone is 0.933 s.
Going corner by corner, the three most expensive corners hold 1.172 s of it: turn 3, the bend at 900 m (0.384 s), turn 6, the big stop (0.404 s), and turns 7 and 8 (0.384 s). Right behind them are turn 1 (0.368 s) and turn 2 (0.317 s). Turns 1, 2 and 3 together cost 1.069 s, and from 460 m on that is the Coach's Segment 2. The eight corners add up to 2.289 s; the rest is in the first and last metres of the lap, outside the stretch the two recordings share, so it can't be put on a corner.
The one thing to fix first: Segment 2, from the curve after turn 1 to 1,030 m. Flat through the left curve after turn 1, straight from the brake to full throttle at the apex of turn 2, and flat through turn 3 on the reference line.
The habit behind most of it
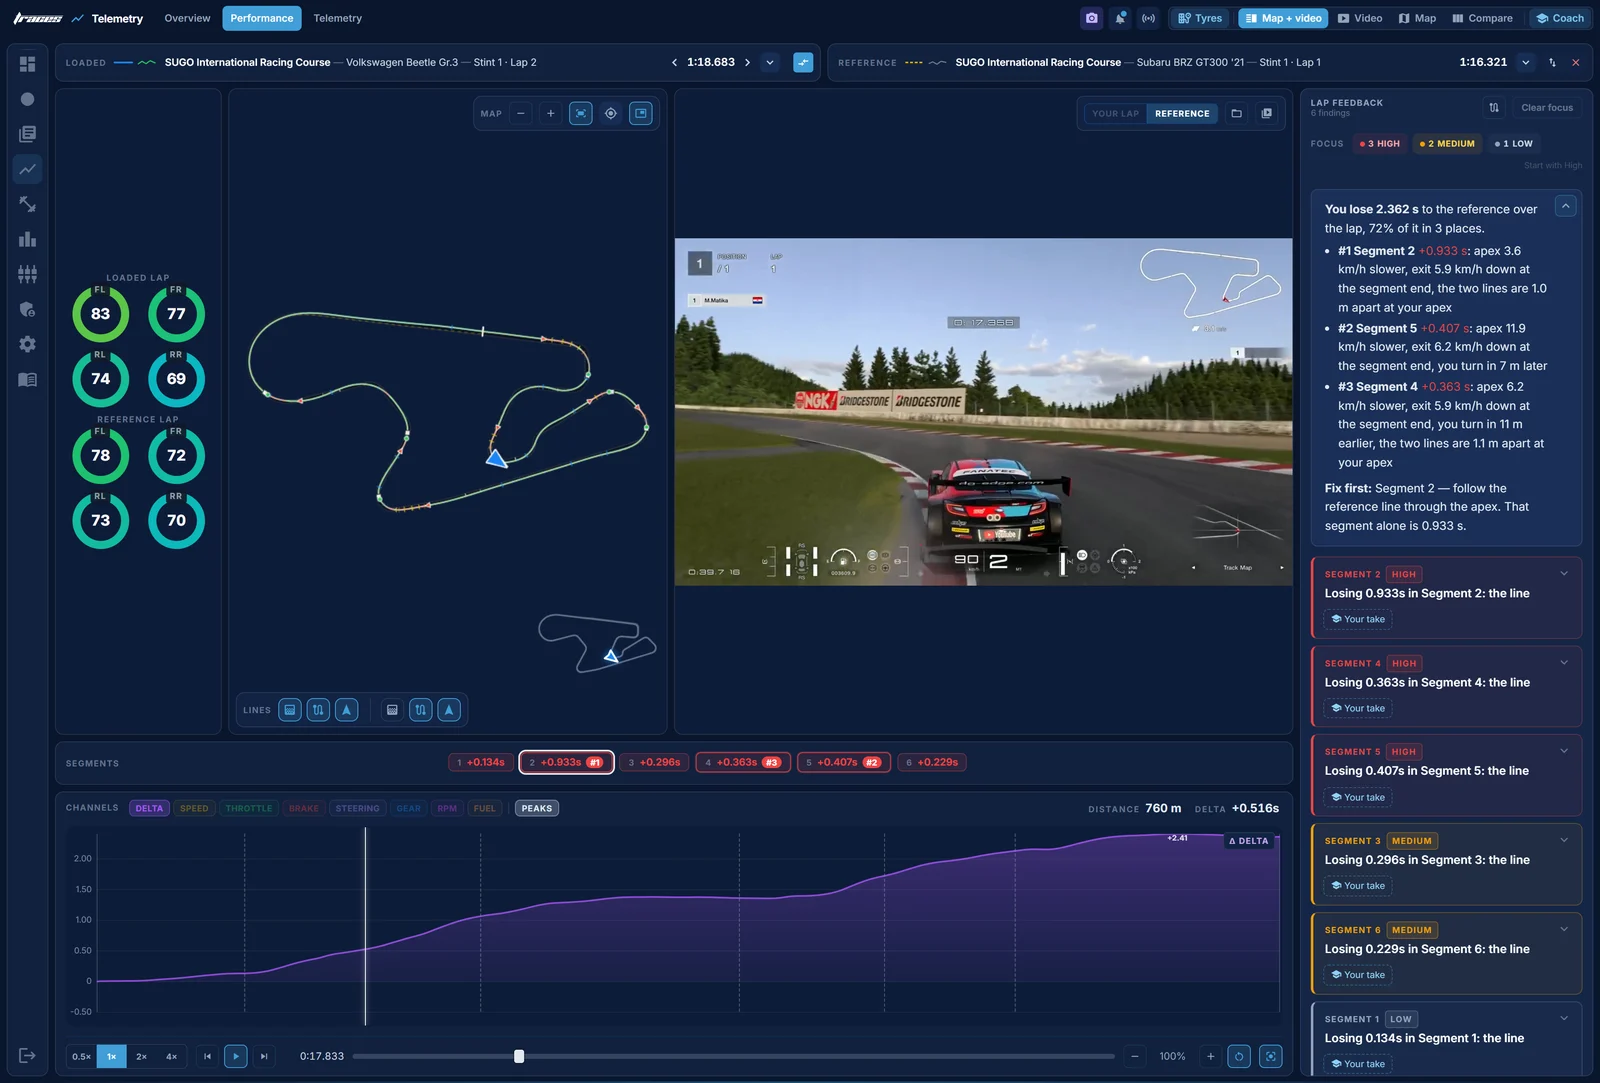
Before going corner by corner, it helps to see the pattern, because it repeats. Kiwi Antonelli's brake points are close to Digit's. The time goes after the brake. In the slower corners, the throttle doesn't go to 100% when the corner opens: a part throttle, or a little brake, stays on, and the car keeps slowing past the reference apex. In the fast corners it's the other way round: where Digit lifts, Kiwi Antonelli brakes, and where Digit is flat, Kiwi Antonelli lifts. In every one of these corners Kiwi Antonelli's slowest point is lower than the reference's.
| Corner | Kiwi Antonelli's pedals | Digit's | Slowest point, Kiwi Antonelli vs Digit |
|---|---|---|---|
| Curve after turn 1 | a lift, then 47.8 to 92.9% throttle | flat from 512 m | 159.8 vs 172.2 km/h at 580 m |
| Turn 2 | 13.3 to 25.9% throttle past the reference apex | 70.2 to 82.4% | 84.2 vs 87.8 km/h |
| Turn 3 | down to 40.4%, then to 53.7% | down to 62.4%, then flat | 123.4 vs 133.2 km/h |
| Turn 4 | brake on until 1,136 m | off at 1,123 m | 117.5 vs 126.5 km/h |
| Turn 6 | 0.4 to 19.6% throttle from 2,040 to 2,072 m | full at 2,052 m | 96.9 vs 103.1 km/h |
| Turn 7 | brake, up to 34.1% | a touch, up to 22.4% | 137.2 vs 149.2 km/h |
| Turn 8, the kink | brake, up to 29.8% | a lift, no brake | 152.5 vs 160.2 km/h |
| Turn 9 | brake, up to 37.3% | a lift, no brake | 167.0 vs 176.2 km/h |
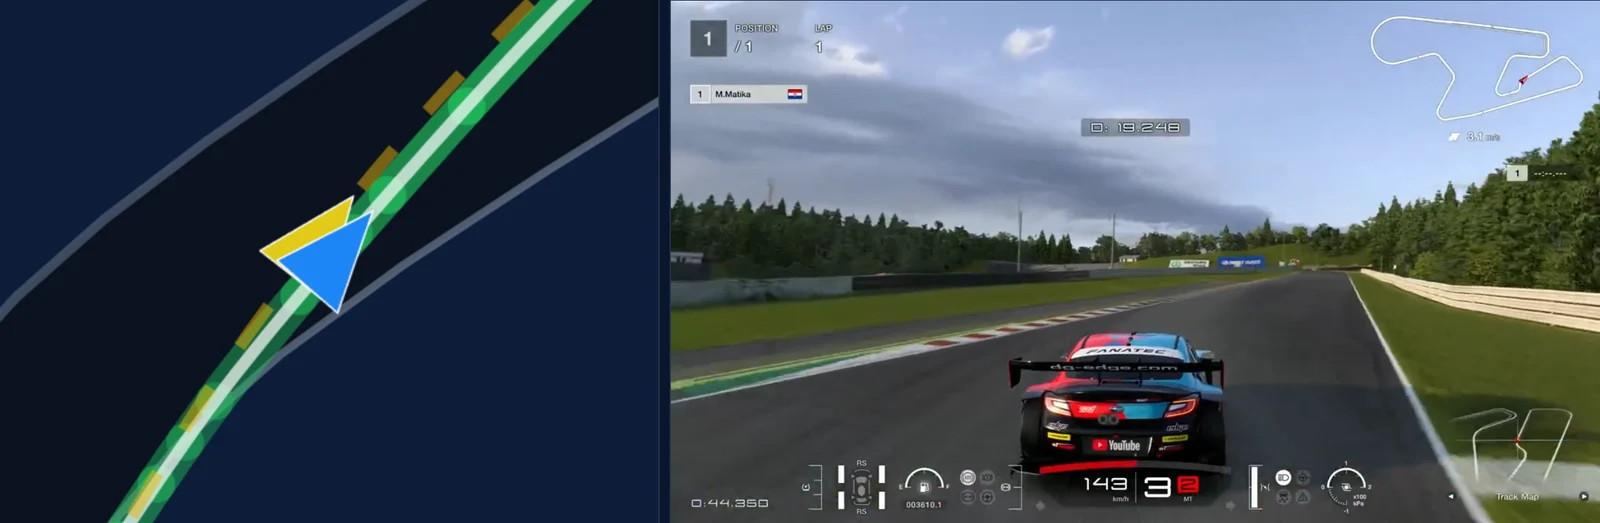
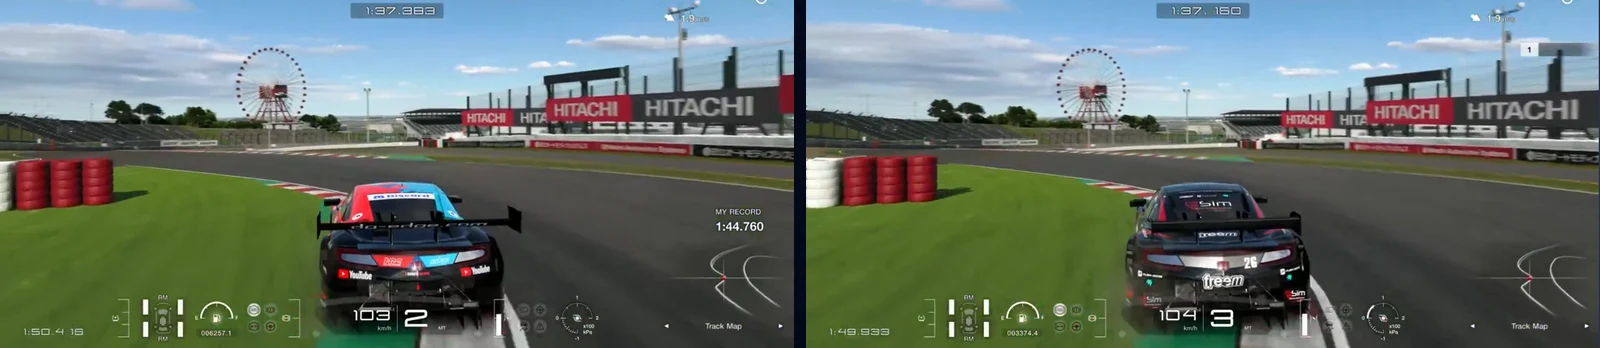
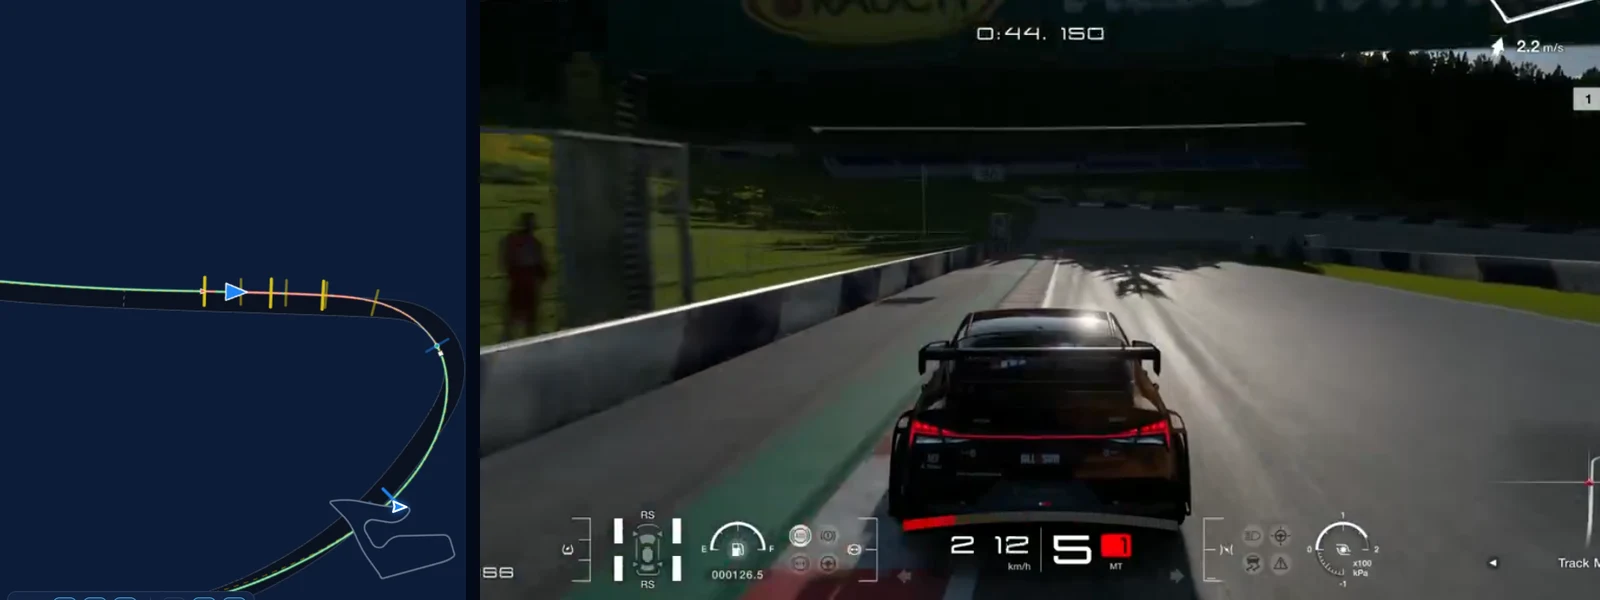
Each corner below has two pictures. The first is the Performance page with the map zoomed in on the corner: Kiwi Antonelli's line in green, the reference line dashed in yellow, and Digit's video at the same metre. There is no replay of Kiwi Antonelli's lap, so there is only the reference video. The second is the Telemetry page zoomed to the corner, Kiwi Antonelli's lap in colour and the reference in grey. The short spikes in the throttle traces during braking are the blips on the downshifts, on both laps.
Turn 1: the right-hander at the end of the main straight, and the left curve after it 0.368 s
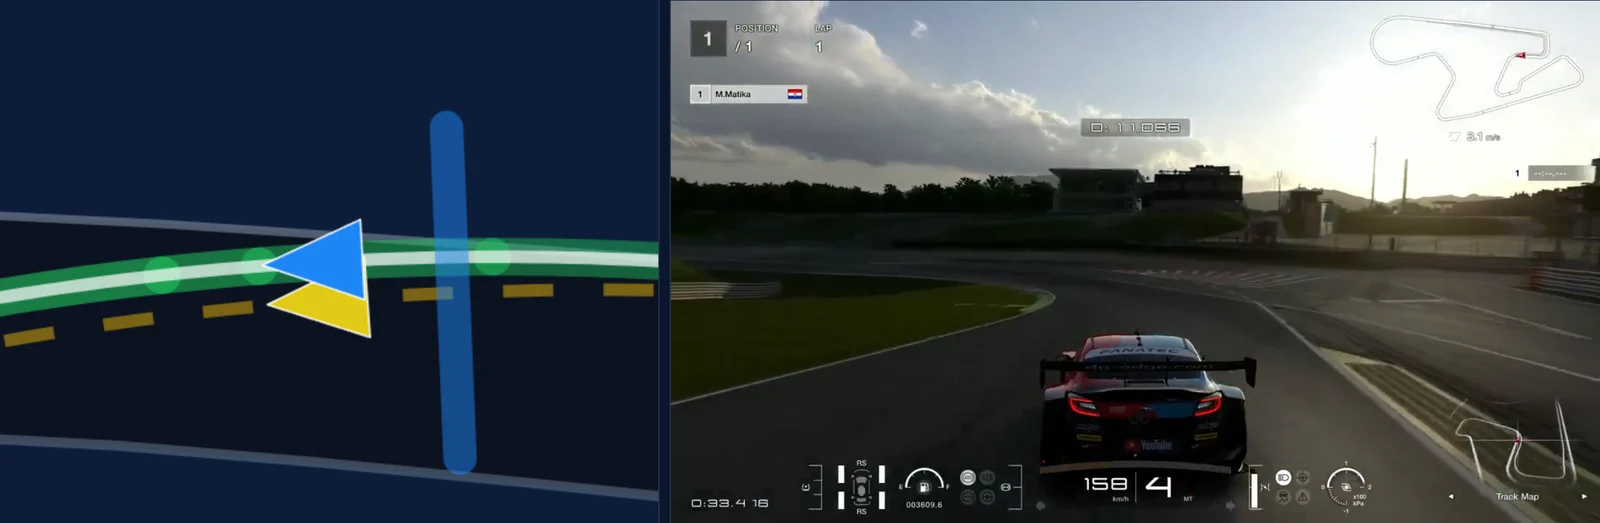
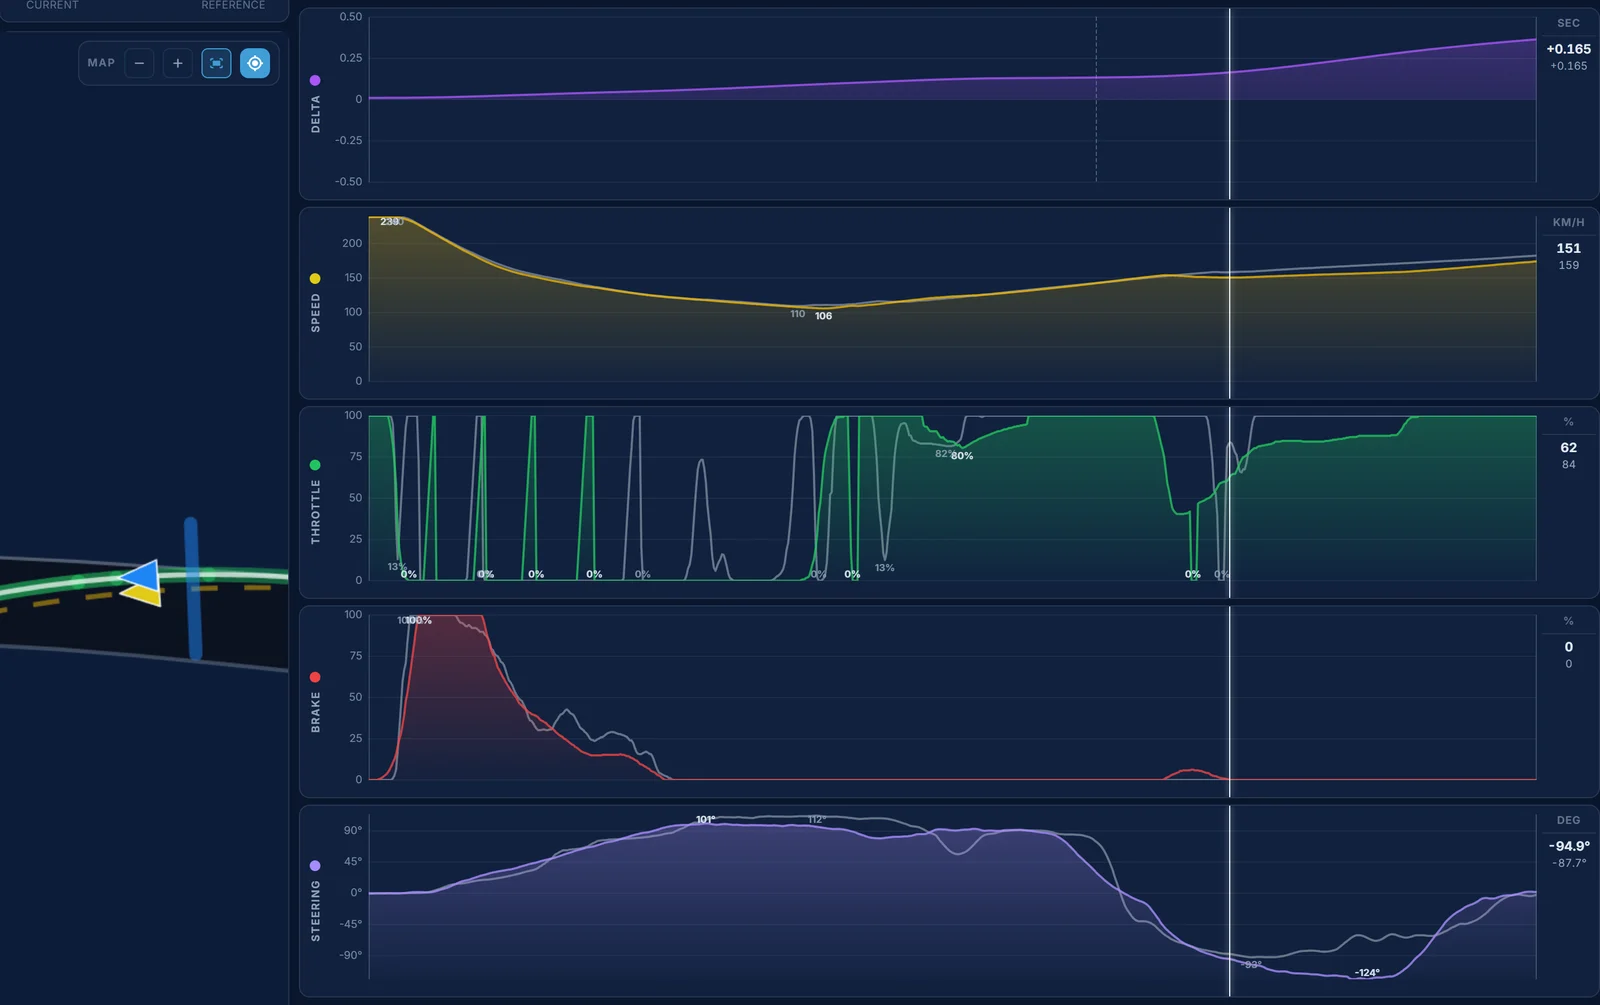
The corner itself is close. Kiwi Antonelli brakes at 157 m, 11 m before Digit's 168 m, at the same speed, 238.8 against 239.6 km/h, and comes off the brake at 296 m against Digit's 299 m. Kiwi Antonelli's slowest point is 106.1 km/h at 347 m, against Digit's 109.6 km/h at 339 m, and full throttle comes at 350 m against Digit's 339 m. By 460 m Kiwi Antonelli is 0.136 s down, and level on speed again: 149.9 against Digit's 149.1 km/h.
The bigger part comes straight after, in the left curve that follows. Digit takes it flat out, at 100% from 512 m. Kiwi Antonelli lifts at 472 m, touches the brake, up to 6.3%, changes up at 484 m, and then holds 47.8 to 92.9% throttle until 576 m. The line runs 1.6 m to the right of the reference at 516 m. At 476 m the two cars are at the same speed, 153.9 against 154.1 km/h. By 580 m Kiwi Antonelli is 12.4 km/h down, 159.8 against 172.2, and reaches the braking for turn 2 at 176.3 against Digit's 184.4 km/h at 650 m. From 460 m to 650 m that is 0.238 s, more than the corner itself.
What to change: take the left curve after turn 1 flat out, with no lift and no brake, so the car reaches turn 2 at the reference speed.
Turn 2: the second-gear left 0.317 s
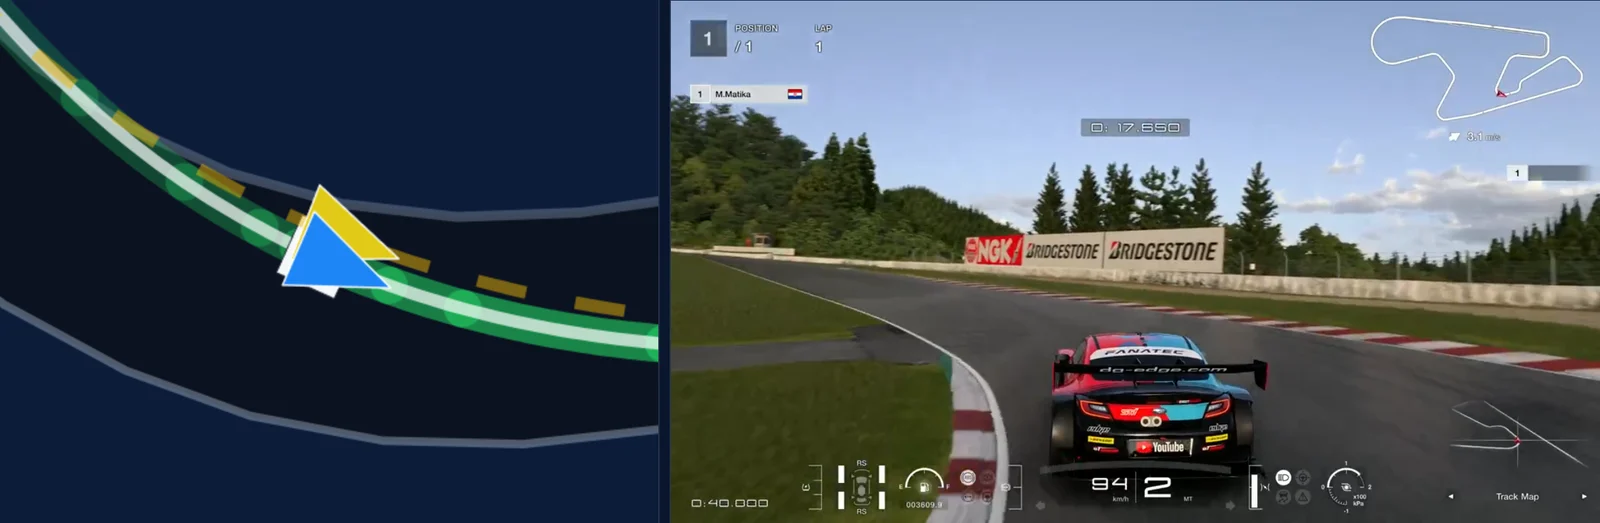
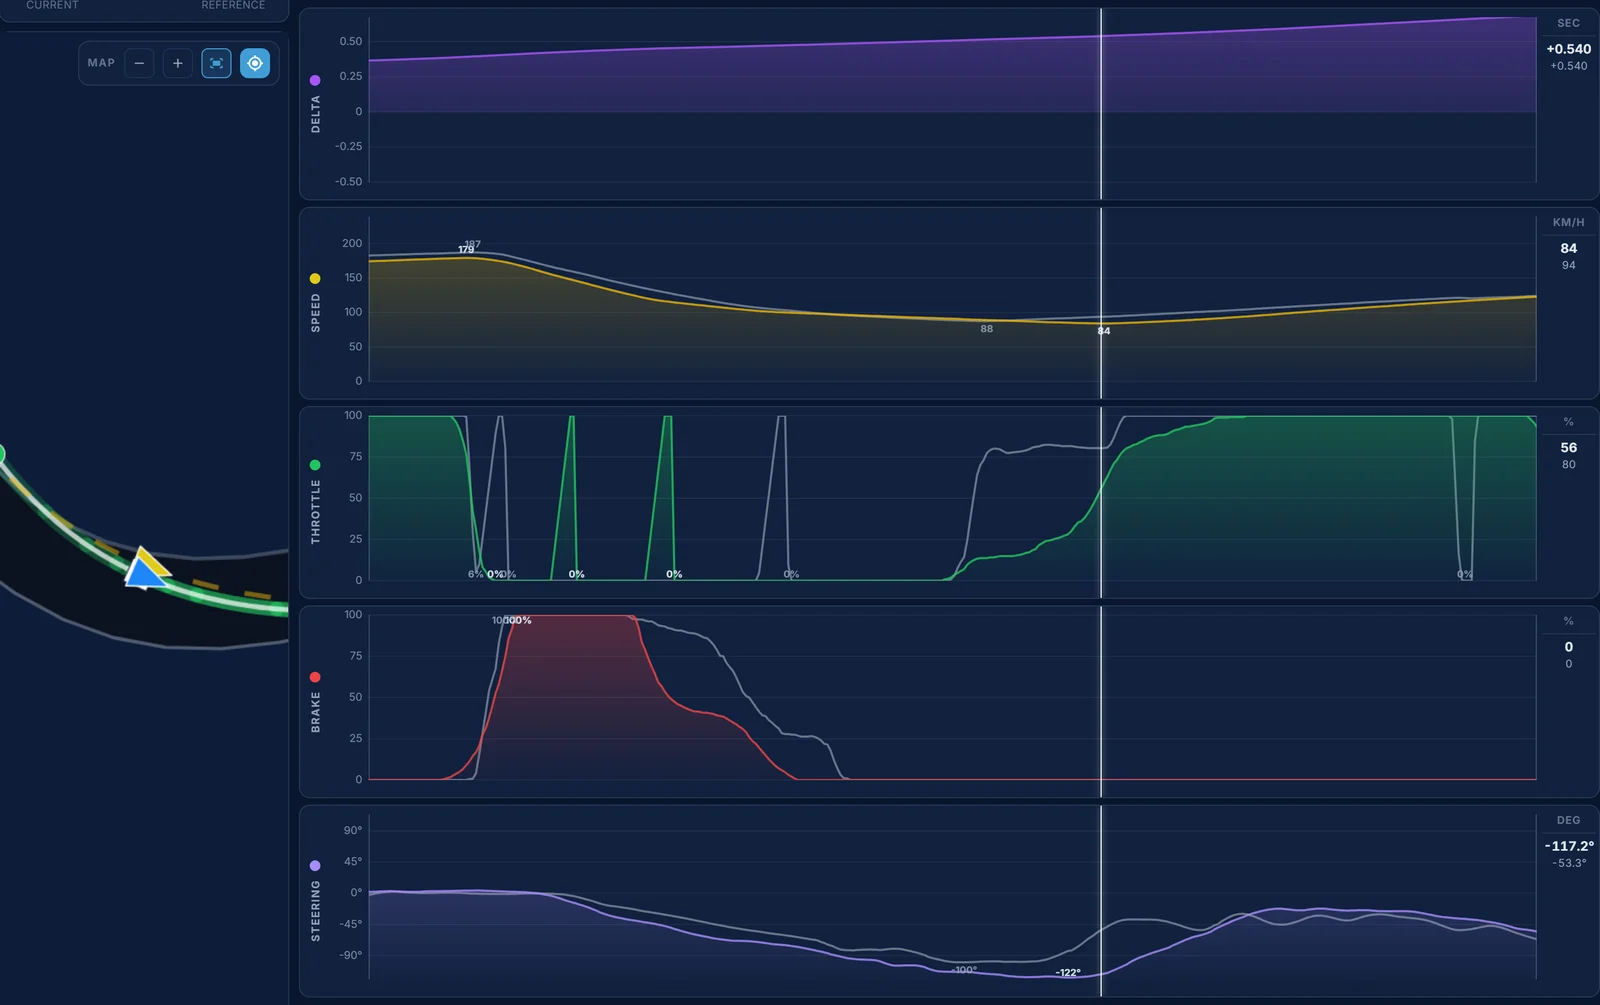
Kiwi Antonelli arrives slower, because of the curve before it: 176.3 against 184.4 km/h at 650 m. The braking starts at 659 m, 7 m before Digit's 666 m, at 178.5 against 187.3 km/h, and Kiwi Antonelli is off the brake at 728 m against Digit's 735 m. The braking phase, from 650 m to 728 m, costs 0.125 s.
Then Kiwi Antonelli carries a little more speed into the corner than Digit: 97.4 against 96.9 km/h 20 m before the reference apex, and 89.3 against 87.8 km/h at the reference apex at 753 m. That speed doesn't make it out. The car keeps slowing past the reference apex, down to 84.2 km/h at 767 m, 14 m later, while Kiwi Antonelli holds 13.3 to 25.9% throttle between 752 m and 762 m and Digit is at 70.2 to 82.4%. Full throttle comes at 776 m, against Digit's 769 m. The lines are together at the apex, 0.1 m apart, so it's not the line here: it's the speed taken into the apex and the wait for the throttle. From the reference apex to 830 m Kiwi Antonelli loses 0.215 s, and leaves at 122.5 against Digit's 123.9 km/h.
What to change: arrive at the apex at the reference speed, not above it, and go from the brake to full throttle at the apex, with no part throttle in between.
Turn 3: the bend at 900 m 0.384 s
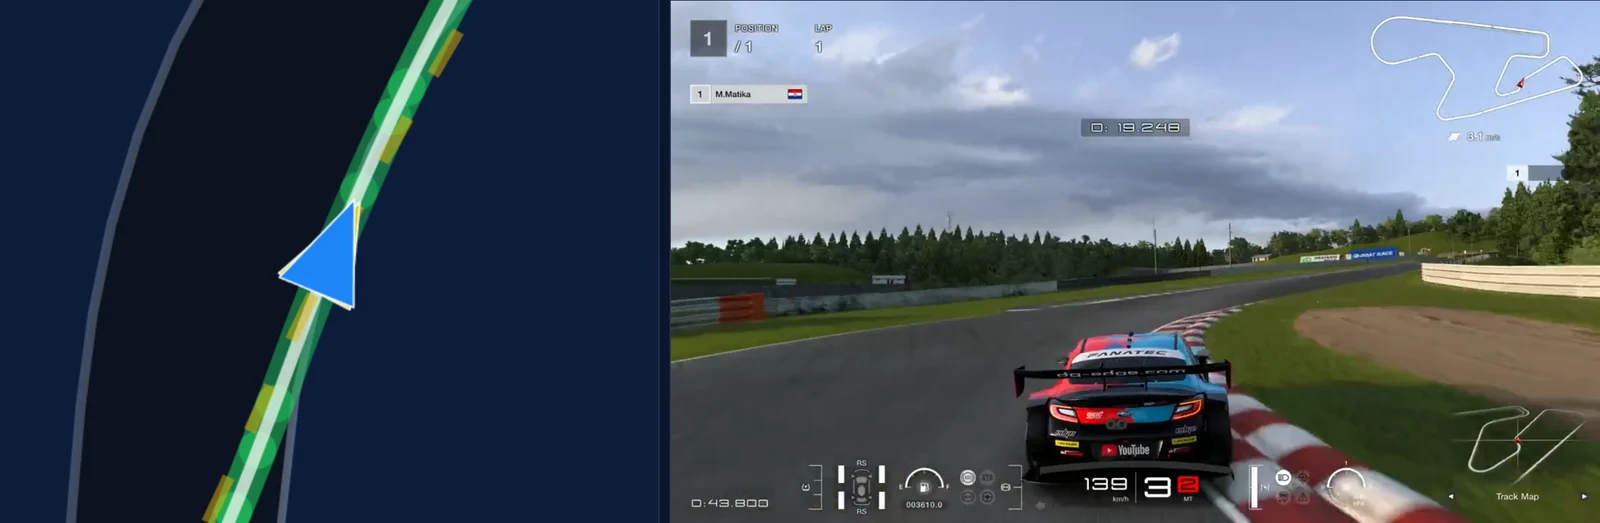
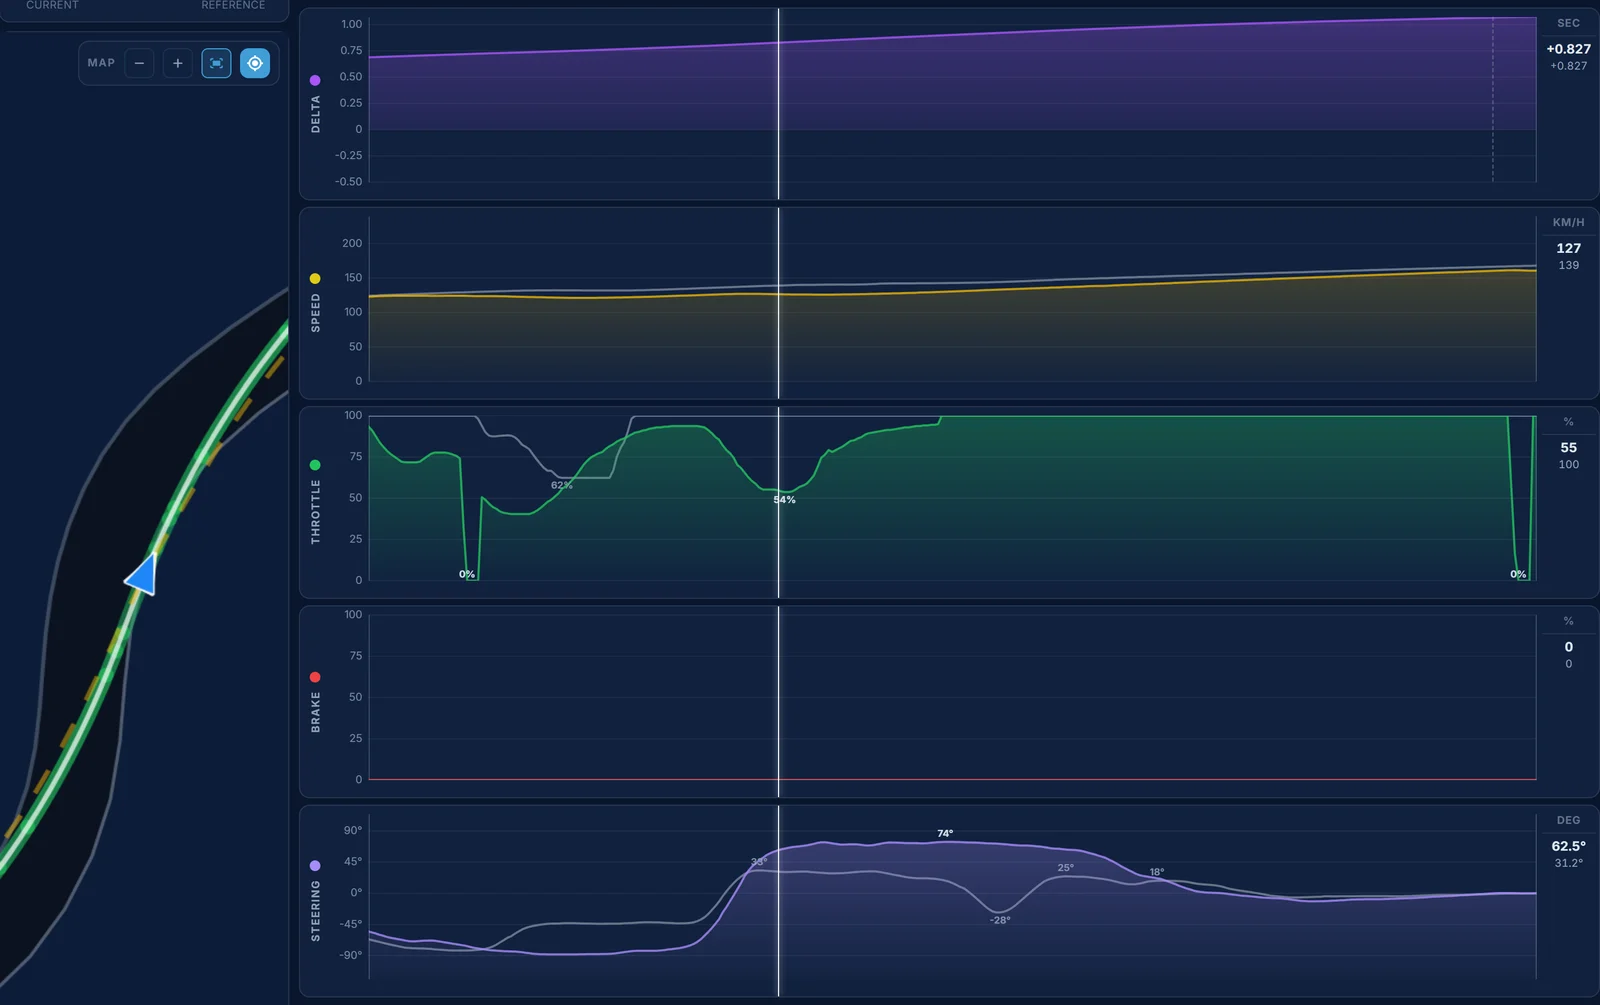
No brake on either lap. Kiwi Antonelli comes out of turn 2 almost level on speed, 122.5 against 123.9 km/h at 830 m, so this one is all about the throttle.
Coming out of turn 2 Kiwi Antonelli holds 71.8 to 81.2% between 832 m and 844 m, where Digit is at 100%, and then goes down to 40.4% between 848 m and 872 m, where the reference's lowest is 62.4%. From 875 m Digit is flat. Kiwi Antonelli is at 90% at 875 m too, but then lifts again in the right-hand bend, down to 53.7% between 884 m and 920 m, and is only flat for good from 922 m. The line runs 1.1 m wide of the reference at 915 m and 1.4 m at 943 m. By 875 m Kiwi Antonelli is 9.8 km/h down, 123.4 against 133.2, by 915 m 13.9 km/h, 128.6 against 142.5, and leaves at 160.9 against 168.0 km/h at 1,030 m. That speed is missing all the way to the braking for turn 4.
What to change: from the exit of turn 2, go to full throttle and keep it there through the bend, on the reference line, all the way to the braking for turn 4.
Turn 4: the right-hander at 1,143 m 0.216 s
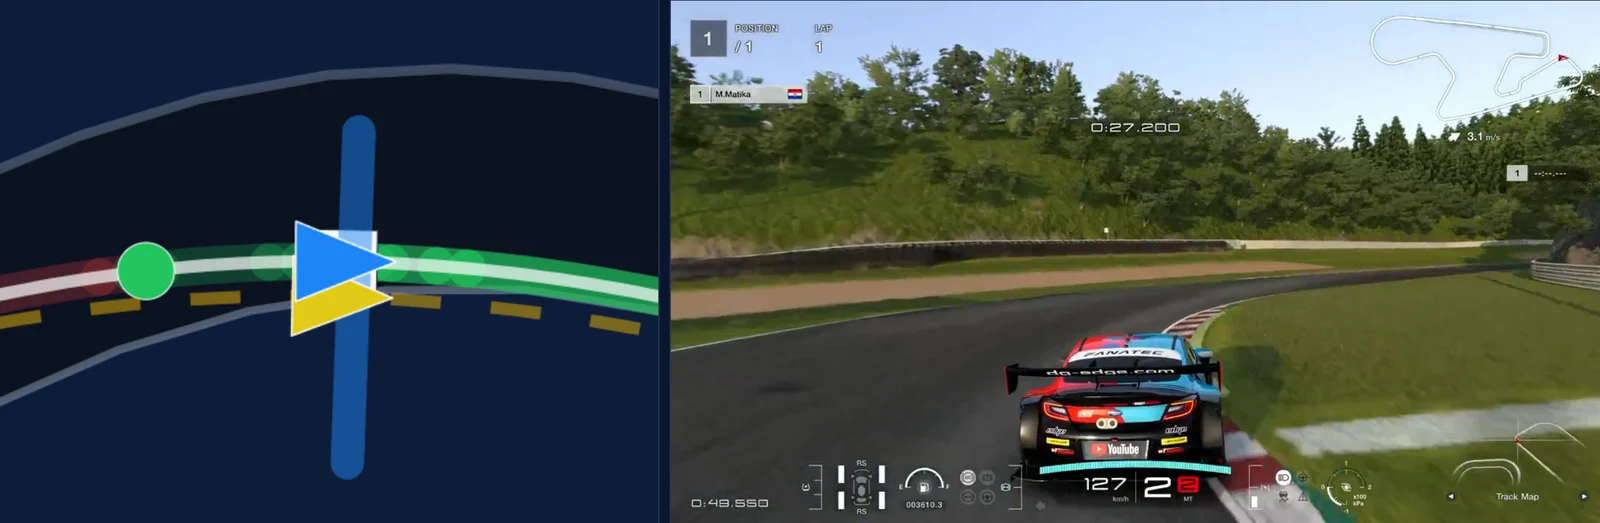
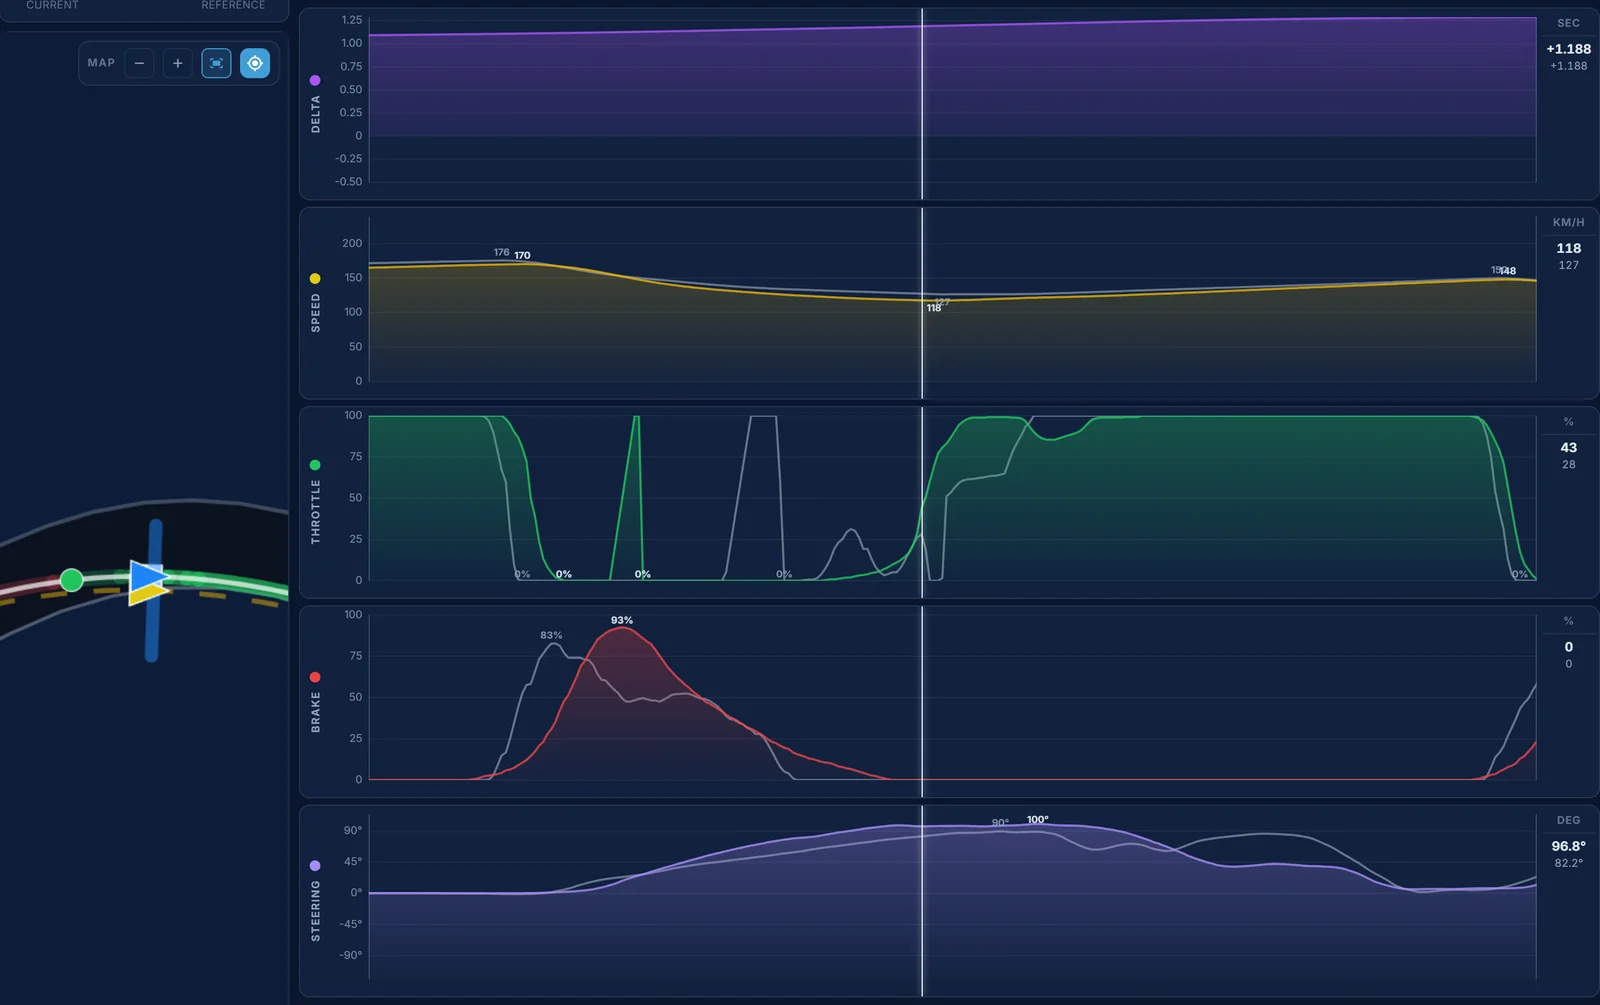
The brake point is right: Kiwi Antonelli's first touch is at 1,070 m and Digit's at 1,073 m. Kiwi Antonelli arrives slower, 169.1 against 175.4 km/h, which is turn 3's exit. The difference is how hard and how long the braking is. Kiwi Antonelli goes up to 92.5% at 1,097 m, where Digit's most is 82.7%, and is still on the brake, at up to 14.9%, from 1,124 m to 1,136 m, after the reference brake is off at 1,123 m. So the car is slowed too much: 117.5 km/h at 1,142 m, against Digit's 126.5 km/h at 1,143 m, 9.0 km/h slower at the apex, and the line is 1.3 m wide there.
The exit is good. Kiwi Antonelli is on full throttle 10 m before Digit, at 1,144 m against 1,154 m, and gets almost all the speed back: 146.9 against 147.7 km/h at 1,230 m. But the time spent going slowly through the middle is gone: from 1,104 m to 1,146 m alone the gap grows by 0.090 s.
What to change: brake at the same point but less hard, be off the brake by about 1,123 m, and let the car carry the speed to the apex.
Turn 5: the right-hander at 1,283 m 0.070 s
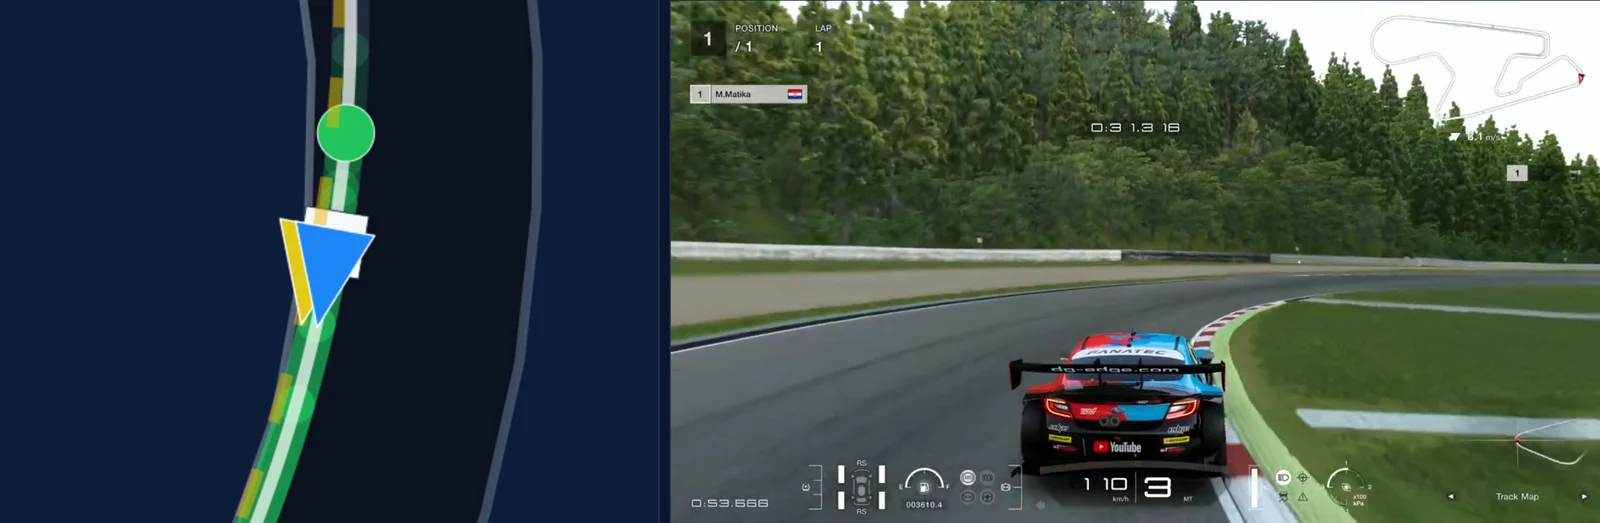
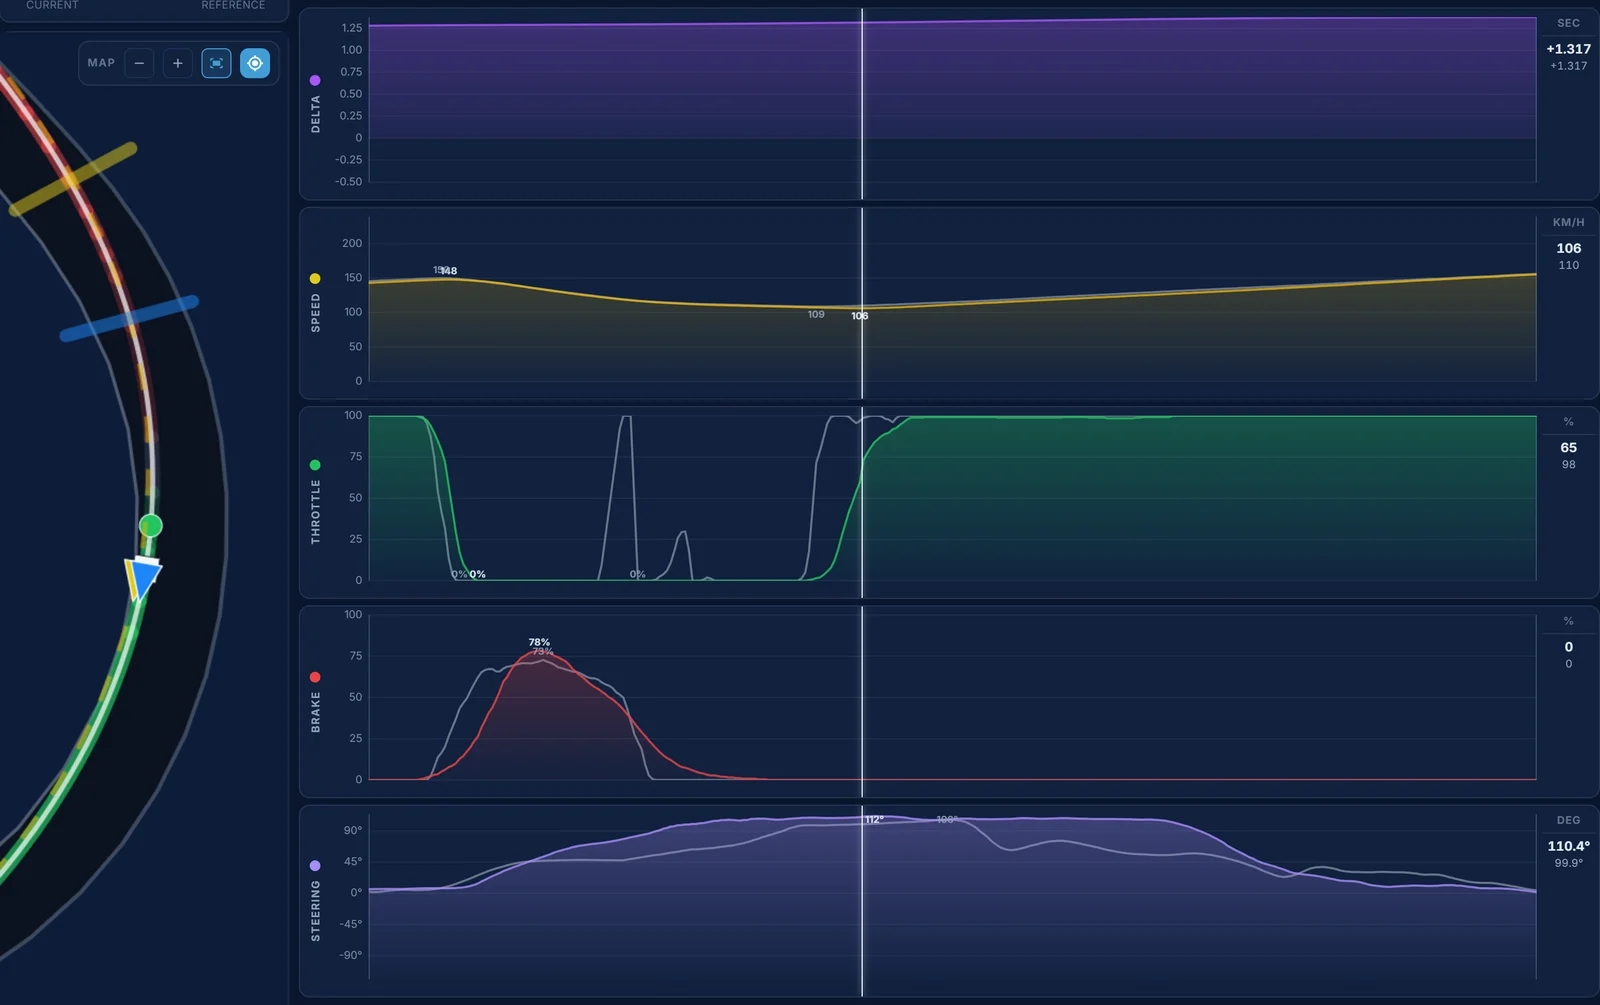
This one is close. Kiwi Antonelli's brake point is 1,220 m at 146.7 km/h, against Digit's 1,222 m at 149.7 km/h. Kiwi Antonelli holds the brake a little longer, off at 1,276 m against Digit's 1,260 m. Kiwi Antonelli's slowest point is 106.3 km/h at 1,289 m against Digit's 108.7 km/h at 1,283 m, and full throttle comes at 1,293 m against Digit's 1,284 m. The line is 0.5 m wide at the reference apex and 2.2 m right of the reference at 1,382 m on the way out. Down the long run that follows Kiwi Antonelli is as quick as Digit, 225.3 against 224.5 km/h at 1,800 m, so the corner costs only 0.070 s.
What to change: turn 4's lesson in small: off the brake a little sooner, and on the throttle at the apex.
Turn 6: the big stop 0.404 s
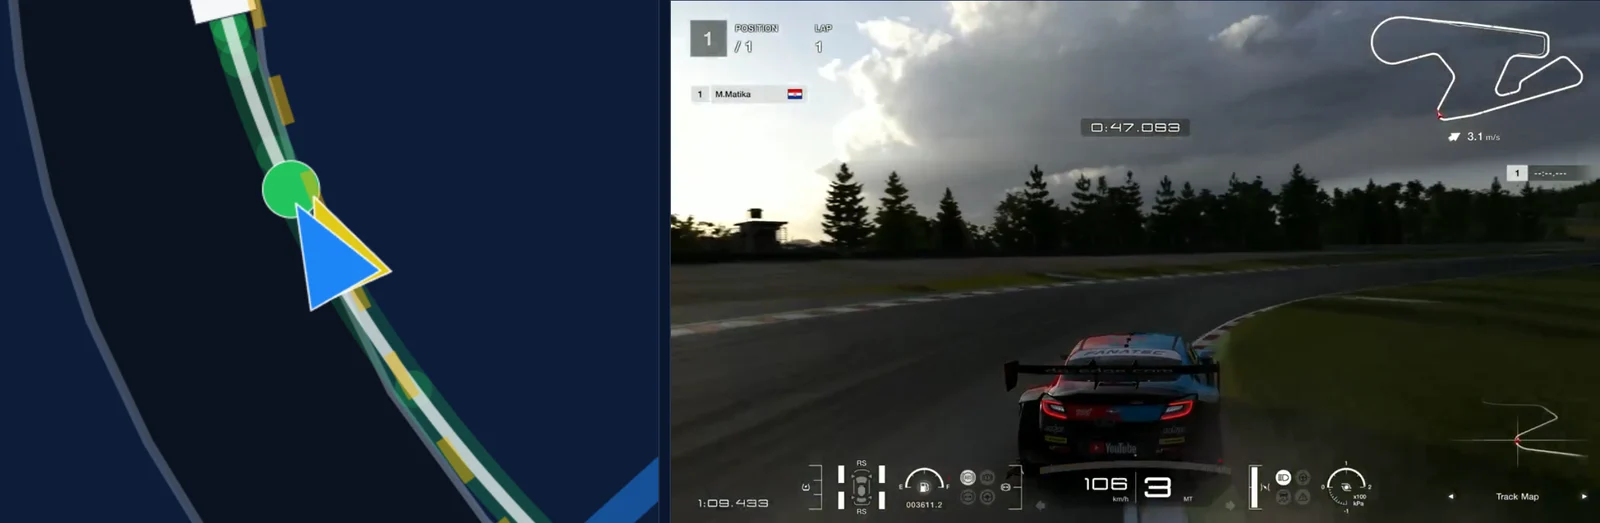
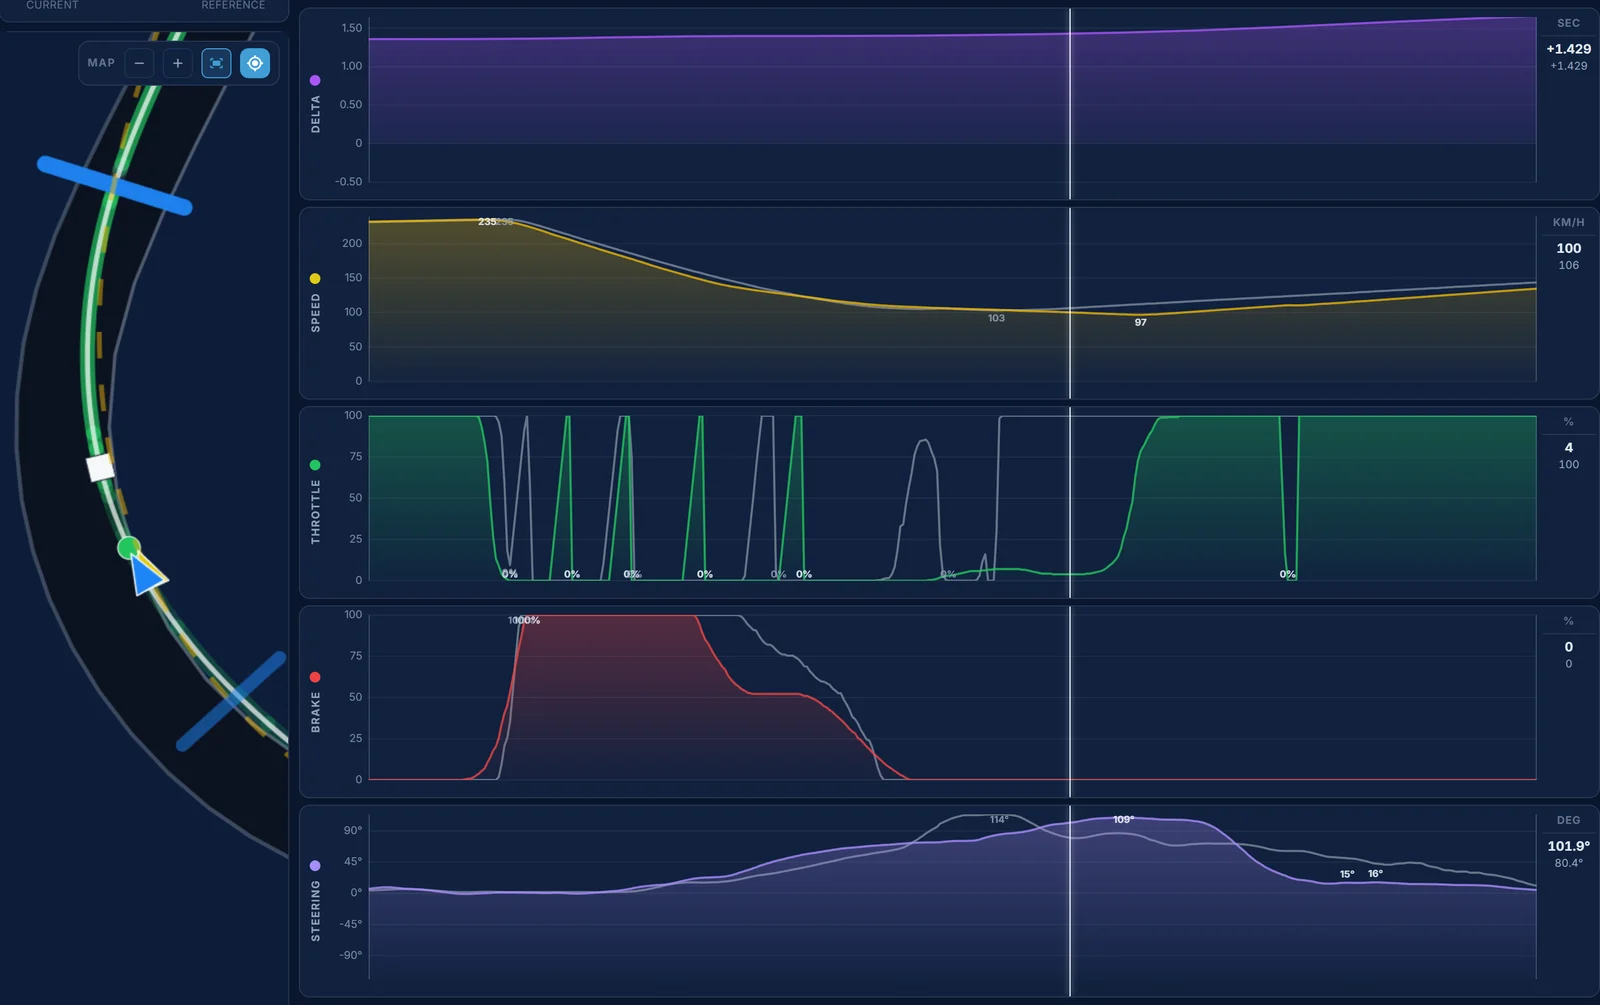
The hardest stop on the lap, from over 230 km/h. Kiwi Antonelli brakes at 1,917 m, 14 m before Digit's 1,931 m, at the same speed, 234.7 against 234.9 km/h, and comes off the brake at 2,037 m against Digit's 2,032 m. In between the braking is lighter: 51.0 to 71.4% between 1,998 m and 2,016 m, where Digit is at 68.6 to 100%. Kiwi Antonelli arrives at the corner faster, 110.2 against 107.1 km/h 20 m before the reference apex, and from 2,016 m to the reference apex at 2,052 m even gains 0.041 s.
Then the car has nowhere to go with that speed. From 2,040 m to 2,072 m Kiwi Antonelli is on 0.4 to 19.6% throttle, and the car keeps slowing, down to 96.9 km/h at 2,076 m, 24 m after the reference apex and 6.2 km/h below Digit's slowest point of 103.1 km/h. Digit is on full throttle at 2,052 m. Kiwi Antonelli is there at 2,077 m, 25 m later, and the line goes 1.2 m wide of the reference at 2,082 m. From the reference apex to 2,230 m Kiwi Antonelli loses 0.388 s, and arrives at turn 7 10.0 km/h down, 150.3 against 160.3 km/h.
What to change: go from the brake straight to the throttle. By the reference apex at 2,052 m the car should be accelerating, not coasting.
Turns 7 and 8: the left-hander and the kink 0.384 s
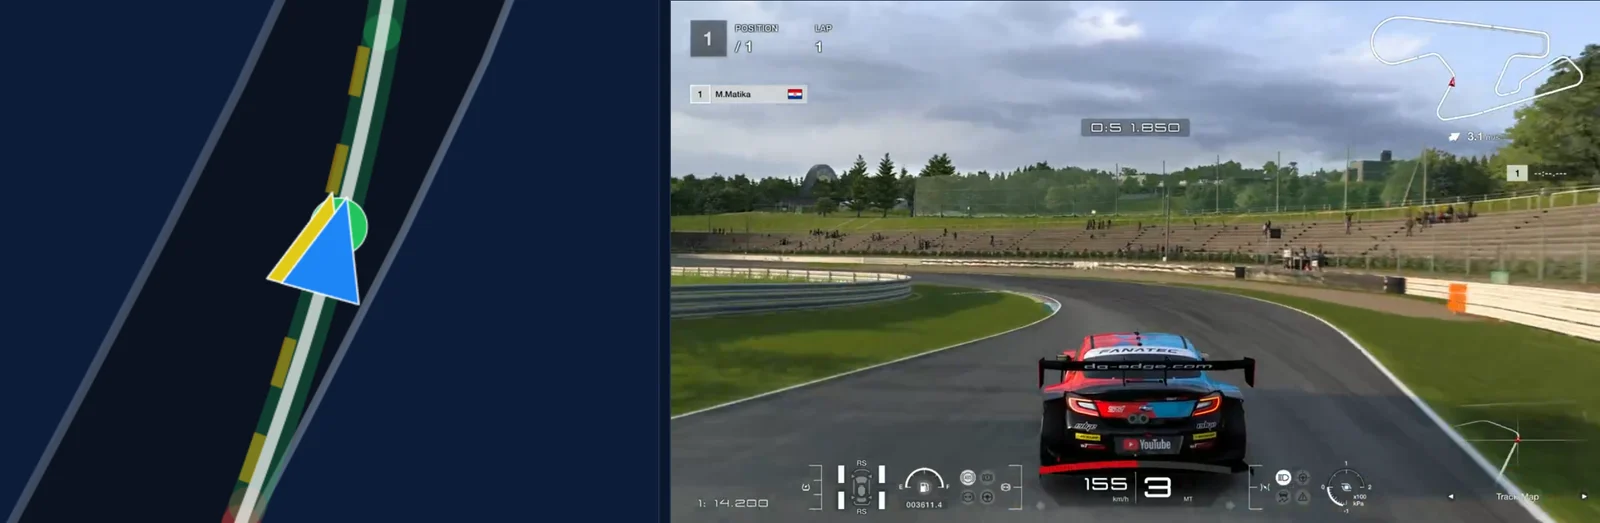
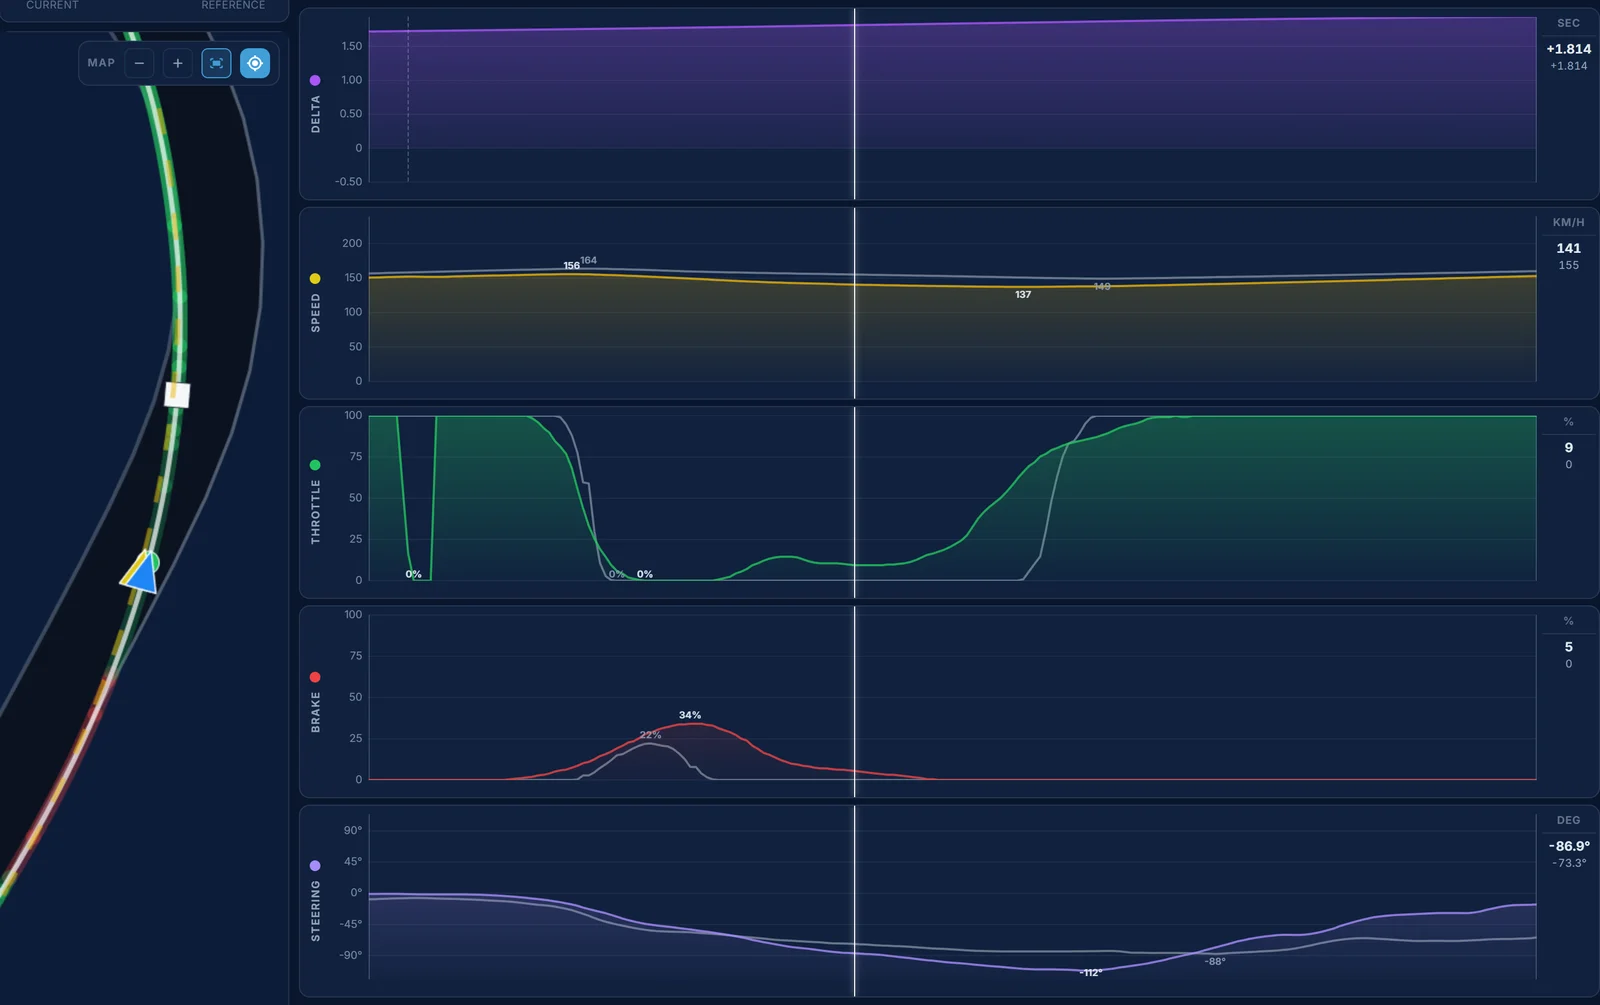
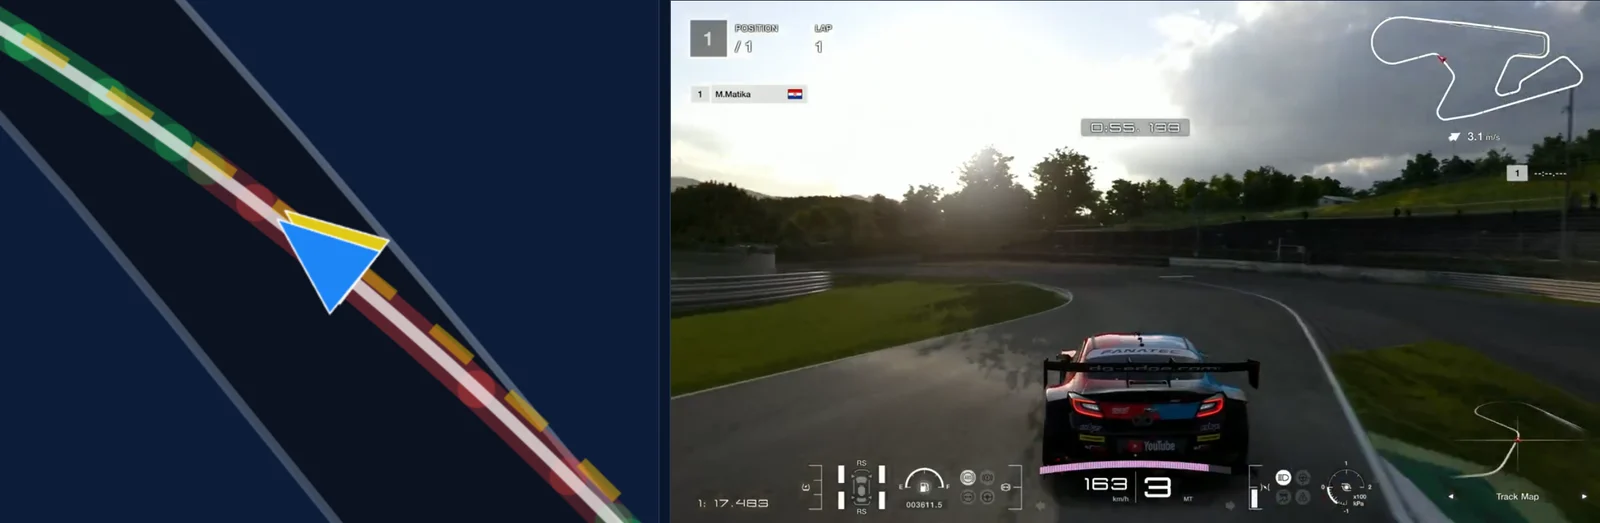
Kiwi Antonelli comes into turn 7 with turn 6's exit still missing: 155.5 against 163.7 km/h at 2,218 m. Then the braking is harder than the reference's. Kiwi Antonelli brakes from 2,209 m at 154.7 km/h, up to 34.1%, and is off at 2,260 m. Digit only touches the brake, up to 22.4%, and is off it by 2,236 m. Between 2,234 m and 2,262 m Kiwi Antonelli holds 0.8 to 24.3% throttle while Digit coasts. Kiwi Antonelli's slowest point is 137.2 km/h at 2,269 m, against Digit's 149.2 km/h at 2,278 m, 12.0 km/h slower, and both are on full throttle at the apex, at 2,279 m against 2,278 m. The lines are together, 0.1 m apart at the apex. So the line is right, and the time is all in the speed.
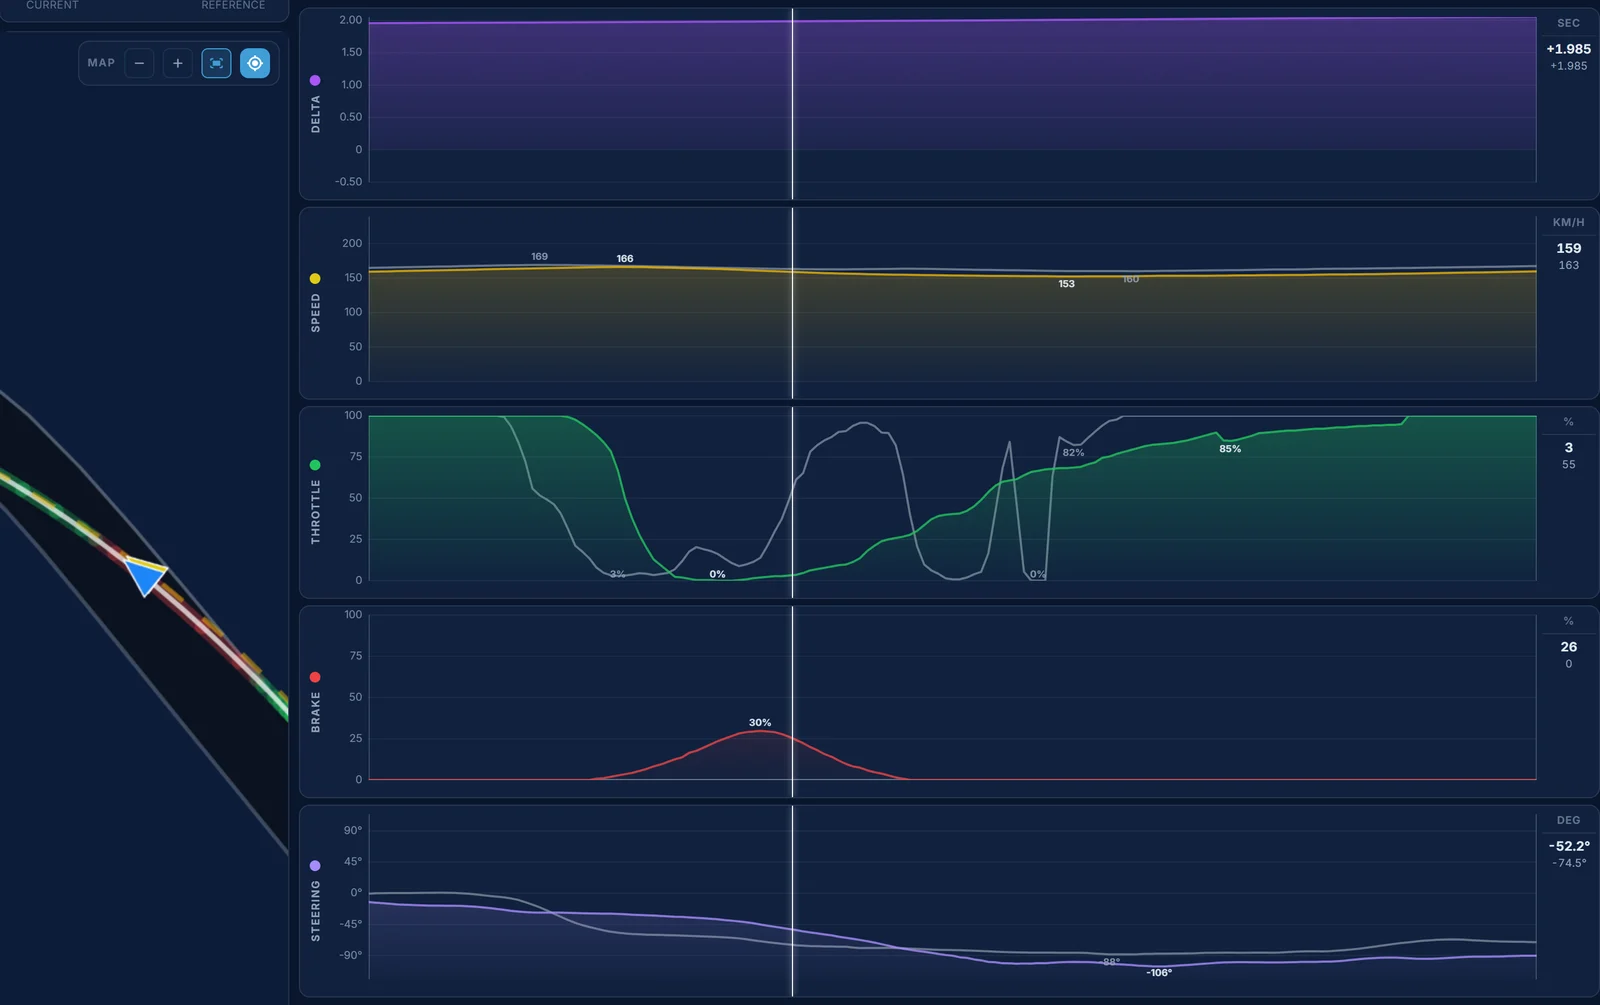
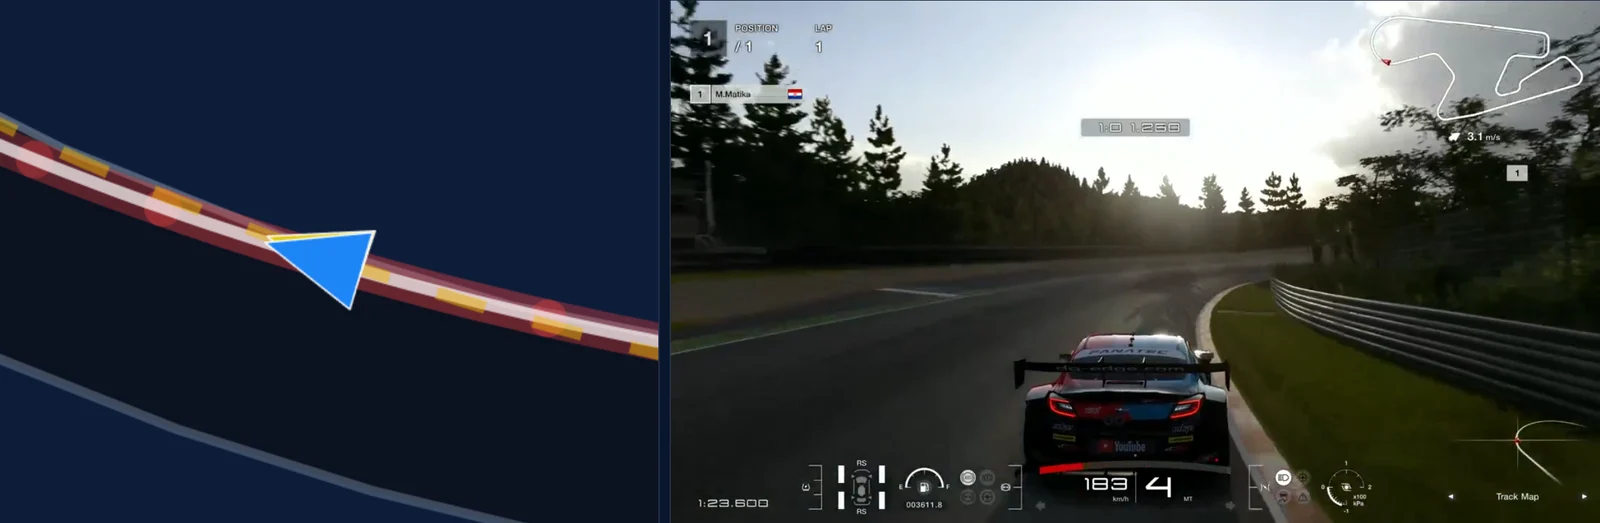
The kink at 2,429 m is the same. Digit lifts for it and doesn't brake. Kiwi Antonelli brakes, from 2,374 m to 2,407 m, up to 29.8%. Kiwi Antonelli's slowest point is 152.5 km/h at 2,423 m, against Digit's 160.2 km/h at 2,429 m, and full throttle comes at 2,443 m against Digit's 2,429 m. Again the lines are together at the apex, 0.1 m apart. Kiwi Antonelli leaves 5.6 km/h down, 188.2 against 193.8 km/h at 2,600 m.
What to change: the line is right, so trust it: these two are lifts, not brakes. Lift for turn 7 and the kink, and stay off the brake.
Turn 9 to the line 0.146 s
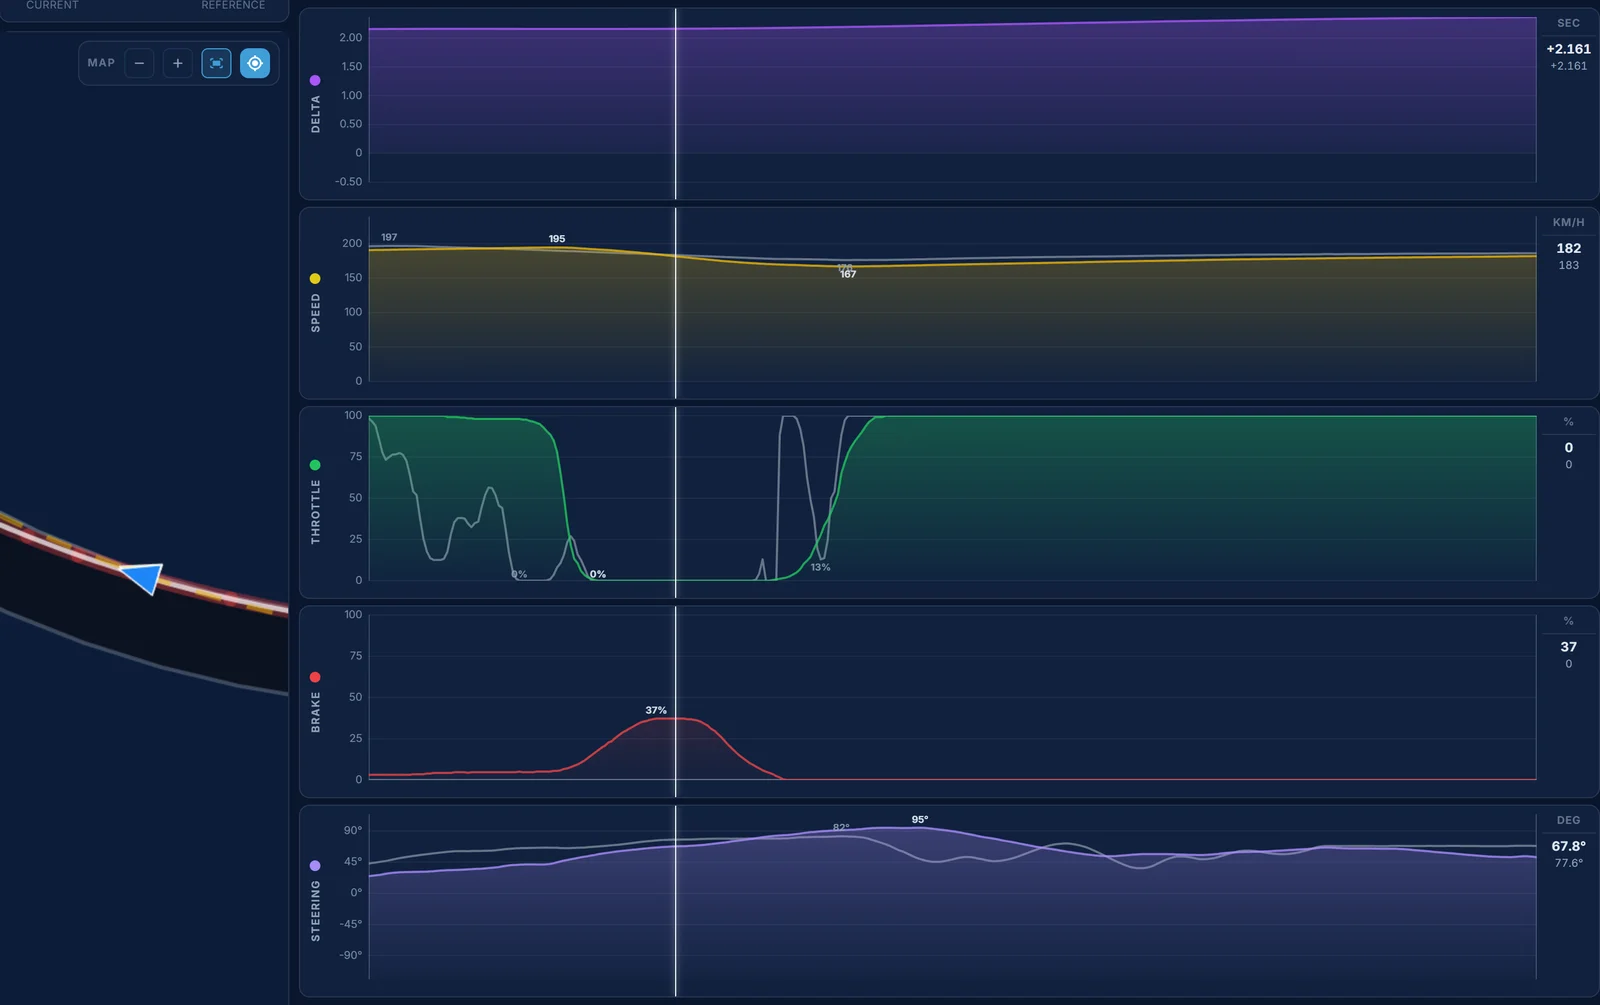
The last fast right-hander. Digit lifts for it, with no brake. Kiwi Antonelli brakes, from 2,661 m at 194.1 km/h, up to 37.3% at 2,695 m, and is off the brake at 2,726 m. Up to 2,700 m it costs nothing, the gap stays between 2.149 s and 2.165 s, but the speed is gone: 167.0 km/h at 2,740 m against Digit's 176.2 km/h at 2,739 m, 9.2 km/h slower, and the line is 1.7 m wide at the reference apex. Full throttle comes at 2,743 m against Digit's 2,739 m. From 2,700 m to 3,000 m that costs 0.238 s.
On the last straight Kiwi Antonelli gets some of it back, 0.095 s from 3,200 m to the line, and crosses it at the same speed, 229.5 against 229.6 km/h. With two different cars there is nothing to read into that part: on a straight, that's the car, not the driving.
What to change: a lift is enough here. Lift instead of braking, and aim to carry the reference apex speed of 176.2 km/h onto the last straight.
What to practise
The one focus for Kiwi Antonelli's next session: once off the brake, the next pedal is full throttle. Start with Segment 2, because it is the biggest part of the gap. Take the left curve after turn 1 flat. In turn 2, arrive at the apex at about the reference speed and go straight to full throttle from there, with no part throttle in between. Then keep it flat through turn 3.
Don't judge it by the speed going into the corners. Judge it in Traces after each run: in the curve after turn 1 Kiwi Antonelli's throttle drops to 47.8% now, and in turn 3 to 53.7%, where Digit's is at 100%. In turn 2 Kiwi Antonelli's full throttle is at 776 m, and Digit's is at 769 m. When those traces through Segment 2 stay at 100%, take the same idea to turns 7, 8 and 9: a lift, not the brake.
Off the track, the Drills in Traces train it with the pedals alone. Throttle Hold builds a steady 100% with no lifts, which is what the curve after turn 1 and turn 3 are missing. Throttle Ramp Up builds the clean, quick move from the release to full throttle, without sitting at a few per cent, the way turns 2 and 6 need it. Brake Release builds coming off the brake before the apex instead of after it, as in turn 4, where Kiwi Antonelli's brake stays on 13 m longer than the reference's. Brake Ramp Up can wait: the brake points are already close to the reference's.
What is already good
Kiwi Antonelli's brake points are good. In turn 4 Kiwi Antonelli is on the brake 3 m before Digit, in turn 5 it's 2 m, and into the big stop the braking starts at the same speed, 234.7 against 234.9 km/h. The lines are right where it counts: within 0.1 m of the reference at the apexes of turn 2, turn 7 and the kink. Out of turn 4 Kiwi Antonelli is on full throttle 10 m before Digit, and turn 5 costs only 0.070 s. And the driving is consistent: the three laps are 1:18.683, 1:18.877 and 1:19.321, all within 0.638 s. Kiwi Antonelli already brakes in the right places and on the right line. The job now is what happens after the brake.
Measured in Traces: Kiwi Antonelli's 1:18.683 (lap 2) in the Volkswagen Beetle Gr.3 against Digit's reference lap, 1:16.321 in the Subaru BRZ GT300 '21, two different Gr.3 cars, SUGO International Racing Course, Daily Race C, Week 44/2026, Racing Soft. Both laps recorded live. Times lost per corner are the gap between the two laps at the corner's start and end; the Coach's segment times are its own. Gears, revs and steering lock are not compared, because the cars are different.